Introducing Our 9 Podcast Editing Tips
If you’re one of those people who can never seem to stay on task, then editing your podcasts may not be the best use of your time. That’s because, much like painting a room, it’s a job that requires attention to detail and a fair amount of patience.
But if you’re up for the challenge, here are a few tips that will make the process a bit easier.
We assume in this post that you not a total podcast beginner, and that you have a basic working knowledge of a DAW (Digital Audio Workstation) or audio recording and editing software.
For all of our info and reviews of podcasting equipment, see here. For information about audio interfaces for podcasting or microphones for podcasting, see the following posts:
Now, without further ado, to the nine podcast editing tips!
Tip 1: Use Separate Mics on Each Voice
There are many reasons why using separate mics on each voice is a good idea. One, it ensures good sound quality, with each voice will be coming through its own mic, with its own ideal levels dialed up such as volume, EQ, and compression.
Two, it makes the podcast editing process far easier (our topic for today), as you can easily cut out any sections where there are mistakes or where someone has been talking over someone else.
And three, it makes for a more seamless final product, as the listener will not be able to tell that different parts of the conversation were recorded at different times.
Enough said. No more leaning into your neighbor’s mic.
Tip 2: Try the old two-taps method for errors
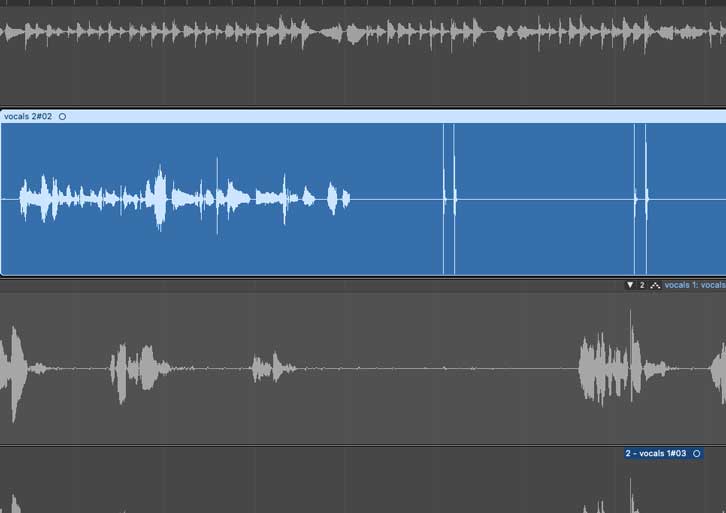
If while recording an obvious error occurs that you know you’ll want to edit out, try the two-taps method. Tap the mic twice with your finger at the mistake point then continue as you were.
This will save you loads of time in the editing process.
You’ll be fast as lightning because all edits will have your ‘marker’ in the waveform, two distinct peaks.
Tip 3: Play at a faster speed while editing
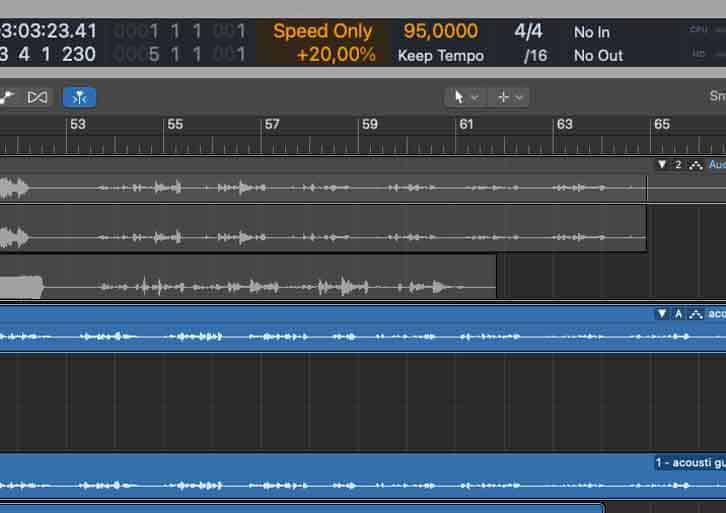
Most DAWs come with some option to speed up your playback. This will speed up the monotonous task of listening to your own voice 400 times. When you’re done, make sure to adjust it back to normal speed for the bounce and export.
Logic Pro X for example has the feature ‘Varispeed’ which allows faster listening without loss of clarity. (If you don’t see this feature in your control bar, control click the toolbar area to customise and add Varispeed.)
TIP 4: Collect some ambient noise while recording
If you collect some ambient noise at the beginning or end of your recording session, this could save you in the editing room. Simply, position your mics exactly as you plan to for the podcast and record the room. Give yourself a minute or two of each room you record in.
When you get around to edits, use this ambiance to mask any obvious shifts in background noise between cuts. Try to use a long crossfade between difficult cuts.
When you’re really struggling, you can always chuck in some music between the cuts. Fade out to the music, then fade back into the conversation.
Tip 5: EQ is your friend
Add some EQ or equalization to your vocal tracks. EQ is an essential audio tool that will befriend you as an editor. It can be used to remove unwanted noises like low rumble, plosives, hums, and buzzes or enhance and flatter sound sources. The benefits and applications are endless.
In your DAW, you will find a channel strip above the individual track (in mixer view or often on the left of your main window) where you can apply inserts or plugins like EQ and compression. Add an EQ plugin here. It is best practice to add EQ before anything else. In other words, it should be first at the top of your channel strip, or the first plugin in your signal chain.
There should be a drop-down menu in the EQ plugin itself, with EQ presets for different applications. Choose a preset that suits your voice, preferably something understated.
You can use this as a starting point, or use a blank slate and start your adjustments. Always err on the side of subtle when removing or boosting frequencies.
Use the following as guidelines for adjustments:
- To get rid of city rumble and reduce plosives – Roll off the bottom end around 100 Hz
- To get rid of muddy unclarity – look to remove a bit in the 200 Hz to 500 Hz area
- For a bit of presence add in the 4-5 kHz area. Make it a tight target avoiding unwanted boost in sibilance (‘s’ sounds) around the 5-8 kHz area.
- For more air in the sound give yourself a starting +0.5 dB of boost at the top around 7 kHz and up
Again, remove unwanted stuff first, then add boost only if needed.
Tip 6: Bring the vocals forward – Add Compression
Adding a bit of compression to your spoken vocals will even out the soft and loud parts, making the overall dynamic range more malleable for mixing and palatable for the listener. The end result is a more polished sound with vocals in the front of the mix.
Ask an audio engineer how to use compression on vocals and you could be stuck in a much longer conversation than you hoped for. If you’re editing a podcast, you probably don’t want the full year-long Audio Compression for Vocals course.
That said, it can get complicated. So here’s a skinny version of instructions:
Compression Instructions (for the spoken word)
1.
In your DAW you will find a channel strip above the track (in mixer view or often on the left of your main window) where you apply plugins to that track like compression and EQ. Here you should insert a compressor (under the EQ on the screen, or after EQ in the signal chain).
Your DAW will most likely have some kind of standard compressor. If not, there are loads of free third-party compressor plugins.
2.
Now, on the compressor plugin, you should find some kind of preset drop-down menu, like in the image below
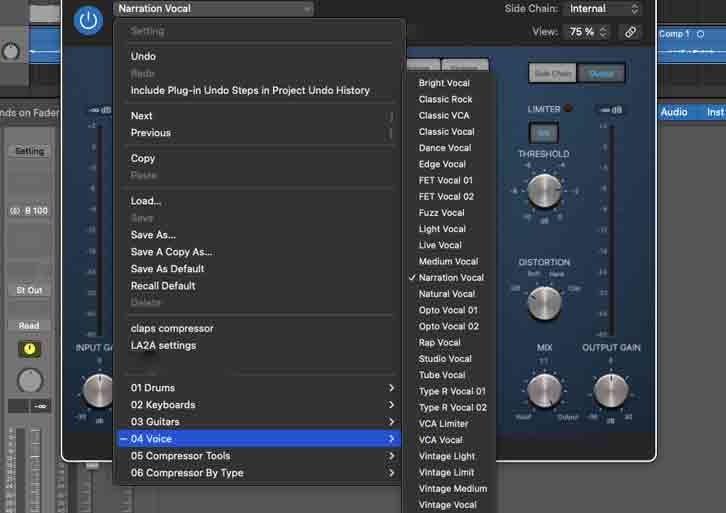
Choose something appropriate for your voice, for example, “light vocal” or “narration vocal”. This will give you a nice starting point for your compression settings.
If there are no presets, or you can’t find them, not to worry. Start with the following settings:
Threshold: -14 dB
Ratio: 3:1
Knee: 1
Attack: 35ms
Release: 48 ms
The Ratio dial sets the amount of applied compression. 20:1 is mega compressed, where the signal is essentially blocked. 1:1 applies no compression at all. So 3:1 is a moderate amount.
The threshold dial decides at what level your compressor will do its thing. In other words, if you set the dial at -14 dB, only the signal peaks that go above that level will be compressed. 0 compresses everything, -50 dB probably won’t compress anything on your track.
3.
Finally, if you want to make adjustments to these recommended settings, start with subtle adjustments on the threshold. If that doesn’t do much for you, increase the ratio (slightly).
Tip 7: Apply Compression in Layers with Aux Channels
Compression works best when applied subtlely in layers. A bit like photoshop edits, or paint.
But how do you do this? You do this through the use of bus sends and aux channels.
Grouping your tracks into aux channels is a time saver and a general best practice for audio production. It is essential for good mixing and mastering. Mainly, because you group your tracks into sections like “vocals”, “effects”, or “music” giving you one fader for that whole group.
But also, for effects like compression, you can divide the effect into layers, or stages, giving you a polished end result. Here’s how to set it up:
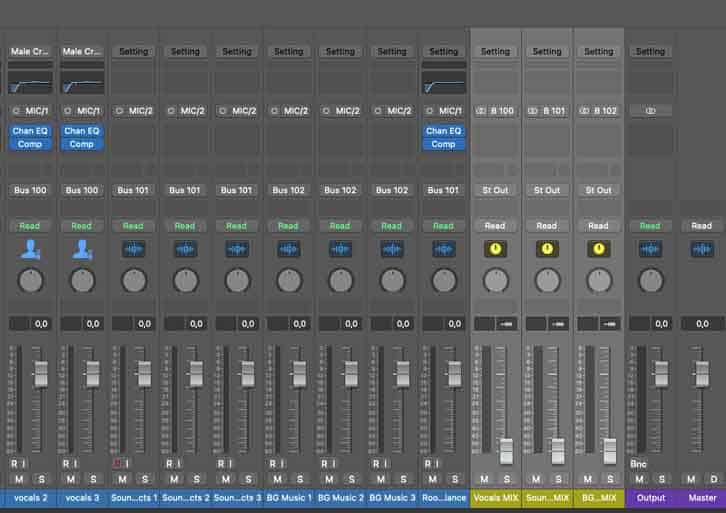
- Create an auxiliary channel in your mixer view and label it “Vocals” or whatever label you like for all your voices.
- On this aux channel, in the channel strip at the top, you will see a channel input label. Set the input to a bus, for our purposes choose bus 100. I usually choose something like bus 100 to avoid conflicts with busses your DAW sometimes creates automatically with different software instruments and effects.
- You should have an output indicator on the channel strip of each track, usually at the bottom. This will by default be set to something like “Stereo Out”. On the channel strip of each vocal track, set the output to your newly created aux channel, “Vocals” (bus 100). Make sure the output of this aux channel is set to “Stereo Out”, it should be by default.
- At this point, your new aux channel is up and running. When you press play, you should hear your track as you normally do. Repeat this process for other groups of audio like sound effects, instruments, or whatever you want to group into one fader.
- Now, you can add a compressor onto the channel strip of the individual vocal track, and then another one onto the channel strip of your aux channel “Vocals”. Now you can achieve the same effect of moderate compression, with a more polished finish. In this case, use very subtle compression (ratio:1.5:1, threshold -14 dB) on both, rather than moderate compression (as suggested above) on the individual tracks.
Tip 8: Use Markers in your DAW
When you’re listening through the raw takes use markers in your DAW at the points where you will want to return to for editing. By making note of these edit points with markers, you don’t have to stop the playback.
If your DAW strangely does not have a marker feature, simply jot down the time stamp while listening through.
TIP 9: CREATE TEMPLATES AND PRESETS.
Of all the tools available to you, templates and presets could very well be your best friends.
Templates of your entire project layout can be created in almost any DAW. A template you create might include:
- Tracks grouped into Aux Channels, as mentioned above in Tip 7, giving you a single fader for each group.
- Intro, outro, transitions on their own tracks with fades already applied. Any audio you plan to use on most episodes should be in your template.
- Markers on your intro and outro showing exactly where you want your vocal or other episode-specific audio to begin or end.
For any inserts into your channel strips like EQ, compression, or reverb, you should have the option to create a preset. This will save you loads of time as you will always have specific EQ and compression settings for each voice readily available as a drop-down preset.
Questions or Comments?
Follow the discussion here on Facebook.
